The Creation of my backyard habitat for wildlife and our enjoyment and how it has grown and changed since 2004.
Wednesday, July 17, 2013
Hydrangea Care: Pruning
I know it has been a while since I was able to blog. But summer got off to a busy start with my grandchildren visiting from Memorial Day weekend through July 4th Holiday. I did get some help in the garen though. It was a lot of fun but didn’t leave much time for blogging!
I fell in love with Hydrangea shrubs when I spent summers with my maternal grandparents. They were great gardeners and I suspect that is where I developed a love of gardening. They had a wonderful vegetable garden, fruit trees and vines and my grandmother Barrick had lovely roses, but it was the huge hydrangea bushes that impressed me as a child. I was not successful growing them when I lived in coastal central Florida but was able to grow them while living in Georgia and now here in coastal South Carolina. My shrubs are not as big as my grandmothers yet and that could be because of the difference in soil. But this year I did have one plant produce a flower almost as big as I remember from my childhood!
When I started to plant Hydrangeas in my coastal Carolina home I had two problems. First was a lack of afternoon shade, so they often struggled until some of my trees started to produce some afternoon relief. But now that most have been in the same place for 8 years they handle most weather conditions pretty well, except for an extended drought. Then I must water often. The second was a lack of space, so I don’t have as many varieties of plants as I would like. But I love the ones I have!
Several of my shrubs are planted in areas where they do not need to be pruned. For them I only need to remove dead stems and dead head blooms and this can be done at any time. My problem comes with the couple I have planted near windows. Originally they were planted there to provide afternoon shade from the two story house. I did relocate 3 plants that were very large (that was a job!) but decided that I would just try to prune the others to keep them from blocking views. Now the best time to prune them is after they bloom. This should be done in June or July. Well in June mine are usually still in full bloom and by July I have either forgotten or it is too hot and I put it off.
This may not seem like a problem but is for hydrangea types that bloom on OLD WOOD. This group of hydrangeas produces flower buds on hydrangea stems around August, September or October for the following summer's blooms. If those stems are removed (pruned) in the fall, winter, or spring, the bloom buds will be removed, and there may be little or no bloom the following summer. (Don’t confuse deadheading with pruning. You can deadhead any time of the year.)
There exists a small group of mophead hydrangea that will bloom no matter when they are pruned. I have an 'Endless Summer' that is this type of hydrangea. Your garden center can tell you when you purchase a hydrangea if it is in this special category called "ever-bloomers." But for the vast majority of hydrangeas, pruning after July will likely result in fewer blooms the next summer.
For most Hydrangea’s- THERE ARE CERTAIN INSTANCES WHEN PRUNING CAN BE HELPFUL:
(1) All dead stems should be removed from hydrangeas every year.
(2) After the plants are at least 5 years old, about 1/3 of the older (living) stems can be removed down to the ground each summer. This will revitalize the plant.
(3) In addition, if it becomes necessary to prune a plant to reduce its size, it may be cut back in June or July without harming the next year's bloom. But it will return almost immediately to its former size. This is one reason why it's best to plant a hydrangea where it does not have to be pruned.
I have one other Hydrangea that is different from the one I have already mentioned it is a PeeGee called ‘Limelight’.
Pruning for H. arborescens (Annabelle types) and H. paniculata (PeeGee types) hydrangeas can be done in fall, winter or spring and it is not necessary to prune them every year. It is suggested that one trim out crossing branches and those that do not contribute to an attractive form whenever necessary. These types of hydrangeas bloom on new wood (new stems). It is a joy to grow these type hydrangeas because they are determined to bloom every single year, no matter how they are treated. The only time they cannot be pruned is in the spring ('Annabelle') or in the summer (PG) when they are preparing to bloom.
When my PeeGee ‘Limelight’ didn’t bloom last year I discovered that it requires more sunlight (about 5 hours) to bloom and it was in a densely shaded area. So I relocated it to a spot where I hope it is getting enough light to bloom this summer. I hope you find this information helpful. This year I will be pruning my mopheads and lacecaps this week!
Tuesday, June 4, 2013
Rain Gardening
I decided to make a small rain garden in a spot where one of our rain barrels overflows.
You might wonder: What is a Rain Garden? In simple terms it is a shallow depression that is planted with deep-rooted native plants and grasses. The garden should be positioned near a runoff source like a downspout, driveway or sump pump to capture rainwater runoff and stop the water from reaching the sewer system.
Your next question might be: Why plant a rain garden? Backyard rain gardens are a fun and inexpensive way to improve water quality and enhance the beauty of your yard. When placed between stormwater runoff sources (roofs, driveways, parking lots) and runoff destinations (storm drains, streets, streams) a rain garden captures runoff from your driveway or roof and allows it to soak into the ground, rather than running across roads, collecting pollutants, and delivering them to a stream. Plants and soil will work together to absorb and filter pollutants and return cleaner water through the ground to nearby streams.
You may wonder: What about mosquitos? The rain garden fills with a few inches of water after a storm, and the water slowly filters into the ground. Because water is only in the rain garden for a day or two, it doesn’t become a breeding ground for mosquitos?
My garden was a small experiment just to see how it would handle the overflow from my rain barrel. I wish I had learned about this garden idea before I originally laid out plans for my backyard landscape (Yes I did initially have a landscape plan and mostly followed it!) so I could have incorporated it into plan from the beginning. My little creation may not be a classic rain garden but it seems to be holding up to our rain.
My biggest problem was keeping the dogs out of it while my plants are getting started. Annabelle liked to eat the tops off plants and thought it was a nice cool spot to take a nap and Maggie just liked to walk through the middle right over the plants. So I put up a small portable fence leaving a small cut through for the dogs on one end of the garden. This was one of their orginal pathways into the yard from the back porch.
Keep in mind that Rain gardens work best when constructed in well-drained or sandy soils, but they can also be installed on sites with less permeable soils such as clays but may need some additional work.
You can easily find books and information on rain gardens. Some you may find helpful are from the Clemson HGIC http://media.clemson.edu/public/restoration/carolina%20clear/toolbox/publication_raingardenmanual_022709.pdf or your local area extension office.
Another good source Rain Gardening.org https://www.raingardens.org/index.php?gclid=COD0iJj4yrcCFQ3l7AodmhsAvw
Hope this gives you an idea for your own yard.
Wednesday, May 1, 2013
Gardening for Birds & Other Wildlife
I was surprised and happy to see an Indigo Bunting in my yard for the first time since fall migration in 2009. One reason I was so excited was because when we moved from the Atlanta, GA area I left behind a wonderful habitat for wildlife for a yard with no habitat. I traded a yard with 30+ trees and multitude of shrubs and flowers to a yard with 2 pine trees and a scrubby small oak tree.
I was used to seeing Northern Cardinals, Robins, Brown Thrashers, Eastern Towhee’s, Carolina Wrens & Chickadee’s, Eastern Bluebirds and Redheaded woodpeckers nest in my yard. I wasn’t sure how to start when the Master Gardener coordinator from Gwinnett County, GA emailed me about the NWF Backyard Habitat program. So I went to the NWF website and started implementing their 4 steps for creating a wildlife friendly garden/backyard. When I look at my yard 9 years later it is hard to believe it is the same yard.

I attribute seeing more variety of birds in my yard to the maturing of my garden. My work over the years seems to be paying off. So I thought I’d blog about gardening for wildlife again and encourage you to give it a try if you haven’t tried it yet. I've added and rework my planting areas over the years to incorporate Food, water sources, cover from predators and nesting areas. My bluebird box was immediately occupied in Feb. 2005 when first installed and has been used every year since. Carolina Chickadees and Carolina wrens have also nested in the yard. Ruby throated Humming birds, Cardinals, Brown Thrashers, Brown headed nuthatches, Red headed woodpeckers, Downy woodpeckers, Tufted Titmouse visit my feeders and bring their babies to feed and bathe in our garden.

It's not hard to get started at all. One of the easiest things to do is just add a bird bath. This can be especially important in dry months or droughts. Here are some ideas for getting started in your own yard.

FOOD: I relied heavily on bird feeders early on and still use them to feed birds when natural food in not available and as a supplement. But I have added Native forbs*, plants, shrubs and trees provide the foliage, nectar, pollen, berries, seeds and nuts many wildlife species require to survive.Blueberries are a favorite food for the Mocking birds who visit our yard.

WATER: All wildlife needs a clean source of water for drinking and bathing and reproduction. Since I don’t have a natural lake, river, pond, ocean, stream or wetland in my backyard I use man made water sources. The easiest way of course is to use a bird bath. I have several in my yard set a different heights including one at ground level. One is a small fountain with recirculating water that small birds love. The ground level is a favorite with some of my shyer and larger visitors. We even see occasional opossums visit our 250 gallon pond with waterfall. One pool of the waterfall is shallow with flat rocks and birds will bathe and drink from it as well. The sound of that pond can attract the wildlife as well. I have recently created a small rain garden I’m hoping to create a puddling area for butterflies.
COVER: I didn't have a lot of cover when we first moved to this house. I had to wait for trees and shrubs to grow up. After 9 years they are producing a fair amount of cover and shade that was missing from my landscape. Wildlife need places to feel safe from people, predators, and inclement weather. Behind my back fence is a small wooded buffer area that provides some cover now and early on. Thickets and brush piles offer great cover with bushy leaves and thorns. I started and keep a brush pile that can be used by birds and other wildlife. Our pond is home to several frogs and we have a toad abode as well. The rock of the waterfall is home to several skinks and anoles.

PLACE TO RAISE YOUNG: Wildlife need places to reproduce, bear and raise their young, and see their young survive to adulthood, all safe from predators, bad weather and human interference. Forming a wildlife habitat creates a place for the complete life-cycle of a species to occur, from tadpole to frog, from caterpillar to butterfly. Many of the cover features in your habitat can also serve as a place for raising young. Consider a wildflower patch for butterflies to lay eggs, constructed birdhouses for nesting birds, ponds for amphibians and fish are places for raising young.
I'm also adding a host plant garden for butterflies to complement what I've been doing for the birds and other wildlife that visit our yard. I'll talk more about that in a later blog.

May is Garden for Wildlife Month and it is a great time to make your yard friendlier to wildlife. It doesn't matter if you’re a first time gardener with only a small space on your patio for containers or if you are an expert gardener with acres to plant. If you take the challenge and turn your yard, garden or outdoor spaces into a habitat for wildlife consider becoming a certified wildlife Habitat with National Wildlife Federation.
*Forb: A broad-leaved herb other than a grass, especially one growing in a field, prairie, or meadow
Friday, April 19, 2013
Top-dressing the lawn

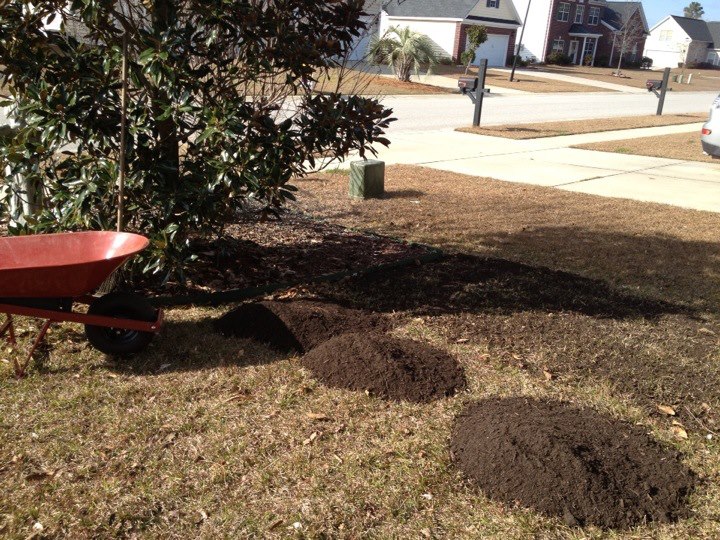
It’s only been 2 ½ months since we top-dressed our front lawn with compost but we are already seeing good results! So I thought I’d go into a little more detail. Top-dressing is an old concept that had fallen by the wayside when the need for instant gratification and convenience triumphed over the old art of manually spreading compost on the lawn. However with new attention to organic lawn care and a desire to reduce the use of chemicals top-dressings is coming back into favor with homeowners.
Topdressing a lawn is the process of adding a thin layer of organic material over the lawn. Typically 1/4 inch - 1/2 inch of compost is spread across the lawn with shovels, in a throwing action. The material can be worked into the thatch area by raking, washed in with rain or sprinklers, or allowed to settle on its own. It is labor intensive and may be a reason for its lack of popularity. Lawn care companies sometimes offer a topdressing service but it is often viewed as an inconvenience because of the materials and labor involved. But as organic lawn care gains popularity, topdressing the lawn on a regular basis may become more popular and more services may offer the service.

Topdressing's benefits are numerous and it's hard to understand why it is not the basis for every lawn care program.
• topdressing can improve soil biology by adding organic matter and the beneficial microorganisms of compost. Soil structure and drainage can be modified by topdressing.
• Topdressing reduces lawn stresses, helps keep thatch under control and acts as a long term natural fertilizer. Adding organic matter to a lawn by topdressing with compost is the most beneficial cultural practice lawn care has to offer.

Topdressing materials vary greatly and are usually dictated by budget and need. Most topdressing is performed with compost, which can vary in quality and get expensive. Compost should be made from the appropriate ratios or wet and dry materials and should be fully "cooked". High quality finished compost should be dark and rich and made with a variety of organic material with few fillers like sawdust or loam.
When topdressing, it is beneficial to do it in combination with other cultural practices like aerating, de-thatching and over seeding. Topdressing after aerating and over seeding (as needed) is the ideal trio of lawn care chores that will result in a healthier lawn. The aerating opens up the soil, allowing for better air and water movement and reduced compaction. The aeration holes provide the perfect seed bed for over seeding, allowing newer generations of grass to establish and thrive. Lastly, topdressing with compost, helps fill in the holes, covering the seed and allowing for ideal germination conditions with a burst of nutrients as the seedlings establish. It's a win, win, win, situation.
I haven’t reseeded my front lawn. Once this application of compost has fully worked the yard is and actively growing I am planning to aerate, then plan to topdress again.
Friday, April 12, 2013
Spring Gardening

It has been a busy spring for me at work and my gardening is way behind of my schedule and because of the odd see-saw weather. Warm then near freezing weather really confused the plants and made it hard to plant my greenhouse plants.
Finally my days off matched up with some nice weather and I was able to put together 2 days of yard work and make some progress in the garden! The late start means I will not have much of a vegetable garden but was able to plant some tomatoes,peppers, squash and herbs. I also have some strawberries plants from last year that I transplanted earlier.
My main concern was getting plants out of the greenhouse where some plants were baking.burning int 100+ degree temperatures in the afternoons.Even with a shade cloth I can't keep the temperatures at an acceptable level.
Most plants are out of the greenhouse now, just a few remain and I plan to move them out as soon as possible.
My front yard has really responded to the compost we put down in the fall! I think my neighbors will be jealous. We have few weeds and the grass is coming up green!
Wednesday, March 6, 2013
Flower Shows
I know it has been a while since I posed anything I blame the weather, work, our puppy’s medical needs and the flower show.
I was invited to help with Flower shows a couple of years ago. As a Master Gardener I was asked to help people identify and classify the horticulture they were entered in the show. It turned out to be very educational because even though I know many of the common names for plants and flowers I didn't know most of the scientific names and as I helped people with their entries I learned a lot of scientific names for plants and flowers.
Eventually I was persuaded to enter some flowers and foliage of my own. First time was at the Coastal Carolina Fair held the end of October and first part of November every year. Didn't win any awards but it was still educational. My second try was at the Breath of Spring Flower show held in March at Cypress Gardens last year. I actually won some awards this time but no ribbons.
Part of my problem with the flower shows is that my garden doesn't cooperate! I have very little in bloom when both shows are held. This year I had the same problem. I did manage to find 3 daffodils; some cut foliage, and discovered I had a Dutch Iris, and several Cyclamen flowers but still not much to enter. So for the first time I entered several potted plants. My Arrowroot vine and Purple Velvet plant won First Awards, my Red-veined Prayer plant won a Second Award and my ‘Red Scarlet’ Cyclamen won a first award but also the Show Chairman Award/Ribbon for most popular entry in horticulture. (All of my other entries received a First, Second or Third Award this year as well.) I will tell you this was a big surprise as I almost didn't enter it because the pot was not the best.
There is also an education component to the garden show. There was a display on Xeriscaping, Backyard Habitat, and growing Succulents (I helped a little with that one).
The Breath of Spring Flower Show is award winning and sponsored by 4 Garden Clubs: Belle Isle Garden Club, Camellia Garden Club of Greater Charleston, The Garden Club of Otranto, Town and Village Garden Club. It is also a member of National Garden Clubs, Inc, South Atlantic Region and The Garden Club of South Carolina, East Lowcountry District.
This year the Breath of Spring Flower Show theme was “Yesterday, Today and Tomorrow”. It was a beautiful show and even had local television coverage.
If you love flowers and have never been to a show consider attending one and even take a chance and enter one. You may be surprised how well you will do.
I haven’t ventured into design yet but might consider it after I get more instruction in that area. After all I've only been a member of Camellia Garden Club of Greater Charleston for a little over a year!
The purpose of National Garden Clubs, Inc. provides education, resources and national networking opportunities for its members, to promote the love of gardening, floral design, civic, and environmental responsibility.

Tuesday, February 12, 2013
Re-grow Romaine lettuce Hearts
I saw this on a The Grumpy Gardener (I think) and decided to try it.
Just save the end from your lettuce and put into a little water (about a half inch). Change out the water every day. The lettuce will grow back incredibly quick too.
The best and most amazing thing about lettuce, besides eating it, is that if the stump is intact it will regenerate and regrow new shoots for a second harvest. I took three photos romaine “stumps” in various levels of regrowth in my herb garden. All I did was put each stump in a half inch of water, check the level daily, and wait for tender new growth. I've also planted the stump right in the ground and had success as well when the weather is cool.
The perfect environment for re-growing leafy greens is a cool and bright window with all day light. Give it a try the next time you have a head of lettuce with the stem still intact. You have nothing to lose and a free harvest of lettuce to gain.
Important Tip: Romaine Lettuce is one type of produce that is easy to find in the organic form. It is often packaged as three heart of romaine and it pays to spend just a dollar or two more and have your salad free from any unnecessary pesticides.
I understand it works with celery as well.
Just save the end from your lettuce and put into a little water (about a half inch). Change out the water every day. The lettuce will grow back incredibly quick too.
The best and most amazing thing about lettuce, besides eating it, is that if the stump is intact it will regenerate and regrow new shoots for a second harvest. I took three photos romaine “stumps” in various levels of regrowth in my herb garden. All I did was put each stump in a half inch of water, check the level daily, and wait for tender new growth. I've also planted the stump right in the ground and had success as well when the weather is cool.
The perfect environment for re-growing leafy greens is a cool and bright window with all day light. Give it a try the next time you have a head of lettuce with the stem still intact. You have nothing to lose and a free harvest of lettuce to gain.
Important Tip: Romaine Lettuce is one type of produce that is easy to find in the organic form. It is often packaged as three heart of romaine and it pays to spend just a dollar or two more and have your salad free from any unnecessary pesticides.
I understand it works with celery as well.
Subscribe to:
Posts (Atom)