Wednesday, October 26, 2011

My Camellia’s are Blooming!

I decided to try my hand at growing camellias shortly after moving South Carolina. I’d heard in Master Gardener classes that the Sasanqua was easier to grow and was more tolerant of the sun. With very little shade in my new backyard I purchased a 1 gallon un-named plant for $6 at Lowes. To my surprise it grew and flowered the first year and even survived a mid-summer transplant to a shadier area 2 years later. I have 3 sasanqua camellias now and in the spring added 2 Camellia japonicas that should start to bloom about the time the 3 sasanqua have finished blooming.

Family: Theaceae (Tea Family)
Common name: Sasanqua camellias
Origin: China and Japan

Camellia sasanqua, like Magnolia, are synonymous with the south. They are frequently found in older neighborhood but seldom in newer one. What a shame and a mystery because they are a wonderful plant and deserve a place in every southern garden! Small plants are inexpensive and easy to find in nurseries. They can survive periods of neglect and have few pests. Best of all, the plants range in size from short to tall, and flowers come in colors from white to bright red.

Sasanquas are broad-leaved, evergreen shrubs with leathery, dark, green, shiny leaves. They are coveted for their flowers but have great foliage as well. They are stunning in a mixed boarder where they provide Fall and Winter color when little else is blooming in the garden. Where ever you place them, they are sure to be a hit. If you haven’t planted one in your garden you are missing out a great shrub! Don’t over look Camellia sasanqua. Plant one in November and it will be well rooted by the time Spring arrives.


Tuesday, October 18, 2011

DON’T TOSS THAT POT! October 19, 2011

Or 8 useful ways to recycle your old nursery pots.

I read this article about recycling nursery pots and realized that I did a lot of these ideas already but found a few new ones as well and thought I’d pass them on in my blog. I keep some pots to use for pass along plants, seedlings and dividing but often end up with way more than I need so was happy to see there were some creative ways to use the left over pots. I also discovered that Lowe’s Home Improvement Stores will recycle your old pots too! I hope you find these ideas as useful as I did.

1. PLUG THAT HOLE*- Potting mix will often dribble out the bottom of a large container so use a multi-pack or 2-inch nursery pot to cover the drainage hole. The pots also have drainage holes but are small enough that the soil won’t wash through. FILL UP CONTAINERS- The pots can also be used to take up some space in the bottom of large containers instead of using packing peanuts, milk jugs or 2-liter soda bottles. Place them upside down and they will save on potting mix and even make the container lighter.
2. SCOOP SOIL*- Use a sturdy nursery pot to scoop potting mix out of the bag and into containers. Double up on them if you have flimsy one that keeps buckling.
3. PROTECT PLANTS- When a late frost or storms comes in, it can damage tender newly planted bedding plants. Protect them by placing a large pot over each plant before the threatening weather arrives. Use something like a rock or brick to weigh the plant down but be sure to test it first to see if the pot can handle the weight. Not all pots are sturdy enough to try this idea and you wouldn’t want to crush that new plant! Remember to remove the pot as soon as possible once the bad weather has moved on.
4. PLANT A BARRIER- Some plants if given the opportunity will take over the whole garden! Cut the bottom out of a pot, sink into in the ground and you can keep aggressive plants like mint, more controlled. Leave the edge of the pot sticking above the soil 1” or so the plant can’t send out runners.
5. STORAGE MADE EASY*- Keep plant tags, twine, or small tool all in one handy spot. Use several of the 4” pots one for tags, ones for gloves, etc. for even better organization in your tool shed or potting bench.
6. PLANT IN SHADE*- Growing annuals under a tree with a shallow root system is a challenge that often has us giving up having flowers in that spot. Nursery pots can make it easier. Try setting several empty gallon pots between the tree’s roots. Then fill a different gallon-sized pot with potting mix, plant your annual and slip the plant-filled pots into the empty ones. When the flowers fade or need replacing you can easily slip in a fresh gallon-sized pot filled with new annuals.
7. GET MORE PLANTS- Layering is a lot s easier using a nursery pot. To do this, find a low-growing stem you’d like to root. Dig a hole and set a soil-filled gallon-sized pot nearby the stem you selected. Then pull then stem down to the ground and pin it in the pot with a landscape staple. Roots will form in a few weeks and the new plant will already be in a pot. This method conserves water and keeps the pot from getting knocked over. When the layered stem has taken root, cut the connection to the main plant and lift the gallon container out of the ground and plant or pass the new plant along to a friend.
8. SPREAD FERTILIZER- Slip one round 4-inch nursery pot inside another and you have an instant spreader for palletized fertilizer. Lin up the drain holes and all the contents flow out quickly. Twisting the inner container reduces the amount of fertilizer coming out and allows for more even application.

I have already been using the * ideas in my own yard but was happy to see these other ideas and plan to try them as well. How about you? See any ideas you can use in your own garden?


Wednesday, October 12, 2011

9 tips for Sensational Harvest


All across the country people are rediscovering the joys of growing their own vegetables, fruits and herbs. As well as producing fresh, flavorful food, a kitchen garden can be a source of nearly year-round enjoyment. If you are planning a fall garden or spring garden consider these ideas to improve your yield.


1. Contain your plants-Rusted washtubs; wheelbarrows, and watering cans make whimsical planters for salad greens such as ‘Red Fire’, Oakleaf, and butter lettuces. Containers add another level of interest while boosting growing space. (Be sure to drill holes for drainage.)

2. Plan for bounty & beauty-The French potager is a kitchen garden designed for visual appeal and productivity. Beginners should start small. Four 4 X 4 beds can provide one or two people with fresh greens, tomatoes, and herbs throughout the growing season. Check with your county extension service for varieties that are the best for your locality.

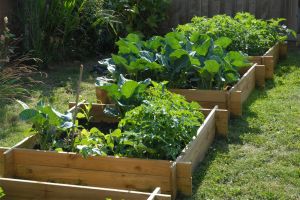
3. Raised beds to lift yields-Garden beds raised several inches above pathways are easier to tend, warm up faster in spring allowing for earlier planting and drain better than flat beds. Make beds 4 feet wide for easy maintenance; pathways should be 4-5 feet wide to allow easy passage with a garden cart.

4. Choose companions-Be skeptical about following of-repeated plant adages such as “plant carrots with tomatoes”. Many of these claims have not panned out in scientific trials, overcrowding beds can reduce yields. Instead, consider edging beds with compact herbs, like parsley or edible flowers like nasturtiums. Herbs and flowers add visual appeal and attract pollinators.

5. Embrace diversity-Grow herbs alongside your vegetables. Loaded with flavor and fragrance, herbs such as garlic and chives can be potent pest repellents. At the same time, tiny herb flowers attract and sustain beneficial insects and pollinators, which are critical for crop production. To reduce plant diseases, nutrient depletion, and insect pests, avoid planting the same crop in the same location is successive years.

6. Build a structure-The best kitchens gardens include a seating area--a shady place to rest and escape the heat of the day. While a well-placed shade tree will do the trick, a pergola also offers the opportunity to grow vines such as grapes.

7. Reach for the sky-Take advantage of vertical space by including climber, which produce more per square foot of garden space than bush varieties. Red-blossom ‘Painted Lady” and ‘Scarlet Runner” pole beans planted along one edge of a row of beds climb 8-foot tall stakes that form tepees over pathways. Tomatoes, peas, and vining fruits also should be supported with stakes, cages, or trellises for big blemish-free produce.


8. Blanket your soil-After the soil warm, lavish plants with a thick layer of organic mulch such as shredded leaves or grass clippings. Mulch helps retain soil moisture, blocks weeds and will gradually break down into humus-all will be beneficial to the plants growth. Mulching can also reduce plants susceptible to soil-borne diseases.

9. Plan to succeed-Double your harvest with relay crops.” Follow spring-planted veggies, such as lettuce, carrots, scallions, or peas, with late-maturing crops, such as sweet corn, melons, broccoli, or kale. Successive crops might occupy the same bed for a short time. By the time the second crop is big enough to take over the space, the first will be ready to pull out. Choose fast-maturing varieties when using this technique.

If you’ve dreamed of gathering basketfuls of sun–ripened fruits and vegetables right outside your door find a sunny location and give these tips a try.

Monday, October 3, 2011

Micro-climate Gardening

A couple of years ago I was gardening on an early spring day and uncovered several impatiens that had over wintered in a flowerbed. The summer flowers were in a protected spot up against our house and were buried under several inches of mulch. I’d discovered a microclimate in my yard. I’ve also discovered other protected growing areas in my yard against a fence and near my pond.

Within a given yard, different areas have different growing conditions, known as micro-climates. These planting pockets can offer a protected microclimate where marginally hardy plants can survive. By selecting plants adapted to each microclimate, you’ll see the most favorable growing conditions. Check your yard to see if you have any of these common microclimates.

Wind- Walls, solid fences, and buildings create wind turbulence as wind travels over and around them. Wind turbulence can damage broad-leaved evergreens, such as rhododendron or boxwood and knock over tall plants. Semi permeable barriers, such as hedges, trellis or nonsolid fence, offer the most effective wind shelter.

Surface colors- Dark colors in buildings; mulches, rocks or fences absorb daytime heat and radiate it at night, forming a warm pocket suitable for frost-tender plants. Light colors reflect heat onto plants during the hottest part of the day, perfect for growing succulents.

Raised beds- Soil in raised beds warms and drains earlier in spring, which hastens planting dates and plant growth. South-facing raised beds stays warmer in winter, allowing tender plants to over winter.


Exposure- Northern exposures tend to be cool, creating a shorter growing season. Southern-facing spots are warmer, offering moderated winter temperatures. Eastern exposures tend to have moister soil; western-facing beds have dryer soil and harsh afternoon sun. In wintry climates, these conditions can combine with cold nights to crack bark on young trees.

If you discover a microclimate or two in your yard see if you can take advantage of them by planting to the strength of the micro climates

.